|
Aurora Photography and Viewing
by B. Kevin McCarthy
Updated 9/6/2009
You saw some great Aurora Borealis (Northern Lights), seen a few pictures and now want to take some of your own. When will it happen again? You don't know where to find information online and nobody who sells the pictures are willing to give up their hard learned knowledge and trade secrets. Here’s a place to start.
The Basics
In elementary school you learned the sun gives us heat and energy in the form of photons – tiny particles from its nuclear reaction – that arrive in the visible and non-visible spectrum. Teacher was heavy on the light that we could see – not so informative on the non-visible stuff. We learned that sunspot activity has an 11 year cycle sending out more than the usual amounts of material that can effect long distance radio transmissions. Nowadays we don’t rely on short wave radio in our day to day life so the significance of the 11 year cycle is lost. It’s become less and less of an issue as most of our long range communications rely on satellites. Those same satellites can be damaged by these particles - so people work very hard to predict when they arrive! This constant stream of non-visible material from the sun is called the Solar Wind with the earth’s atmosphere filtering out many harmful particles and non-visible rays in the ionosphere.
Like anything in life – the sun has ‘bad hair days’ rated on a scale of 1 to 20 called CME’s for Coronal Mass Ejections. These can be unexpected eruptions on the surface of the sun aimed at the earth or from a known and identified sunspot aimed at the Earth. “Aimed” at the Earth is the key. The satellites we rely so heavy on don’t like being stuck by particles. It damages the fragile sensitive sensors and can cause a complete disruption in the satellites reception and transmissions. As people on the surface become less effected by the Solar Wind the satellites that work for us become more sensitive to it.
When a CME occurs both heavy and light weight particles are sent out in a fast moving stream with the lighter particles traveling faster. The heavy weights come in later on. As these particles arrive at earth they will chose between attraction to magnetic North or magnetic South of the planet. Remember the old experiment using a bar magnet under a piece of paper and spreading iron filing on top? Some went North, some South, but none in the middle – the mass of solar wind does this too. As these particles enter the ionosphere they light up for a fraction of a second and are gone. These particles arrive in unpredictable waves and levels – sometimes giving a uniform green glow, or, more often quick moving displays that pulse, ripple and seem to dance in the sky.
CME’s, sunspots, and the Aurora Borealis are a 24/7 year long phenomenon. The Aurora’s arrival has nothing to do with winter, snow or polar ice cap reflections. We see it more in the winter due to the lack of sunlight. They are called Northern Lights and Southern Lights because small CME’s and sunspots give a nightly show in the higher latitudes closer to the poles every two to three nights.
When lighter particles of a CME arrive you can expect green glows in the sky – which are perfectly normal nearly every night in the Fairbanks Alaska area where I live. Long time Alaskan’s won’t comment on the common green Aurora’s seen every night unless they include yellows, reds, and the rarest of them all - purples that are caused by larger more violent CME’s and the heavy particles they throw. Large CME’s with a long duration will give green glows one night with reds and purples the next as the larger slower moving particles finally arrive. Then there are multiple CME’s where one fast stream arrives on top of the previous day’s heavy particles and you get an orchestra of colors in the sky.
It has been my experience that more is not always better. When a heavy concentration of particles arrive the Aurora spreads out over the planet. The Aurora starts early – 9pm – and is very spectacular as it parades southward across the sky. Eventually it passes over head, becomes low on the southern horizon and then nothing is visible except for a light green shroud that covers the sky like a green fog. It’s the leading edges of the Aurora that provide the most dramatic displays. On a large Aurora this happens early in the night, the envelope passes over head and then returns again early in the morning as the Aurora retreats. This edge is what you want to photograph. Some nights the edge is 10 minutes and the end is 10 minutes – the Aurora comes and goes before you can get to your favorite spot. You need to be prepared to catch the Aurora.
How to catch the Aurora
Seeing the Aurora Borealis depends on four things. First, how close to magnetic north you are is very important. Second, how matter is coming toward the Earth and how easily it penetrates the magnetosphere – CME’s can force their way into our atmosphere while holes in the magnetosphere can allow a low matter count to produce a large Aurora. Third is the time of year and last are your local weather and cloud conditions.
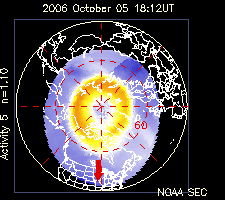
NOAA has a wonderful web site called “Space Weather Now” at http://www.sec.noaa.gov/SWN/ initially designed to give advance warning to NASA, military and civilian communications satellite operators when particles that could damage sensitive instruments would arrive. The main page has a real time Aurora map that shows the current relative position of the sun and the estimated aurora corona. See Figure 1. This map is a good resource to assist in predicting if the aurora you are viewing in the sky will get better – and if it’s worth the time to get out and take a picture. Please note this map is only a numerical representation from various weather satellite measurements made into a computer projection. There are no magical cameras over the poles creating it.
FIGURE 1
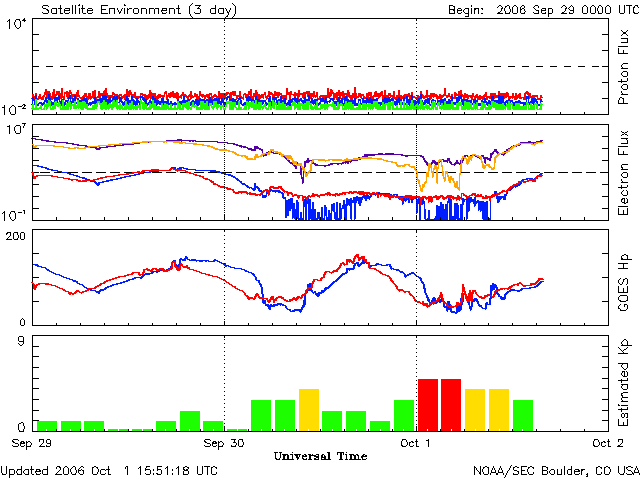
The Space Weather Now web site has a tutorial on the Aurora, viewing it and most important a map of the US with bar graphs showing the particular strength (K value) required for the aurora to be visible in your area. There is also a latitude chart to calculate the K value for all parts of the globe. Once you calculate the K-value for where you live, you’ll have a reliable means of looking at the Aurora map and understanding if you will see it tonight or not, and, how ‘good’ the display will be.
Figure 2 is a representation of the current day’s readings. For me, living near Fairbanks Alaska the “Green Bars” indicate little or no particles arriving at the Earth and tonight’s Aurora activity will be small and not worth watch. I may never notice the Aurora as it will be easily hidden by lights from the city. “Yellow Bars” mean the Aurora will be noticeable but probably not worth photographing. “Red Bars” indicate a K5 event has happened and the Aurora will happen. I have never been disappointed during a “Red Bar” display. At K6 people in Seattle, Michigan and Maine get to see it. At K7 and K8 folks in Texas get a view. At K9 it’s visible in the Hawaiian Island and Puerto Rico.
Besides the obvious bars the graph holds other data. Alaska is 8 time zones removed from the United Kingdom (England) which is considered UT or Universal Time. The graph is in UT. A day has 8 blocks 3 hours in duration each. It’s been my experience a Red Bar that occurs right now will give an active, moving and photogenic Aurora in 6 hours. In 18-24 hours the heavier particles arrive and give a dull background color to the sky. The best looking Auroras happen when a red bar is followed by another red bar 24 hours apart. The first “Event” sets a nice green background for the second “Event” which seems much brighter because it’s actually two Auroras – the tail end of one on top of the beginning of a second. This is when I have taken my best pictures.
FIGURE 2
You could log into Space Weather Now every hour of the day and look at the graph. It sure beats sticking your head outside in the cold and looking up. A better way is to register at Space Weather Now for their email alerts. Living in Fairbanks, anything K-2 or higher gives an aurora. But a K-2 aurora for my latitude is just a general un-interesting green glow. I chose to receive alerts at K-4 and above – these have always been very photogenic auroras. Normally I don’t gear up to photograph a K4 but SWN tends to issue a K4 warning first then update it to a higher level later on. This early K4 warning is useful – I know when to take a nap for a long night, empty my camera’s memory cards, load film and or charge batteries. Yes, I have missed some nice K-4’s Auroras but you need to draw the line somewhere. Again, K5’s have never disappointed me.
SWN has a very nice lady (Candice) who answers all their email and sets up the warnings and alerts. You can do your own calculations and sign up for the warning products or email her with you city/state/zip code and she will calculate the right value for you – and send a test message.
Registering at SWN will give you a 4 to 12 hour ‘heads up’ that you need to prepare for some nocturnal photographic activity. As you log into the site pay attention to the Real Time Solar Wind Pages – once you get the hang of reading this these measurements will give you an idea of how fast you need to get to your favorite spot. In Fairbanks during the winter the Aurora normally begins around 9:30pm to 3am with a 20 minute average lull between great displays. Like anything in nature – it does what it wants – so be quick to unpack your gear. Frequently at 1am I’ve been caught all packed and ready to head home when the best of the night decides to arrive.
Clicking on “Today’s Space Weather” gives a 3 day forecast at the page top that is great for predicting sunspots known to generate CME’s that are about to point toward earth. Like earthquakes – it does not predict rogue CME activity. Skipping to the Satellite Environment Plot is a K value graph. Green and yellow bars are normal activity. Red bars nearly always mean Aurora activity is on the way!
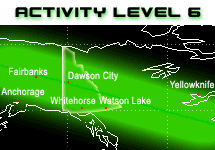
SWN isn’t the only online site with up to date Aurora Activity information – For Canadian and Alaskan viewers you can log into http://www.auroraforecast.com/ where a very easy to read map will show an estimation of where the night’s Aurora can be viewed. See Figure 3.
FIGURE 3
Both SWN and the above mentioned Yukon Aurora Forecast have some technical gauges that give readings. When the solar wind velocity is low, around 350 km/s, the chances of a good Aurora are slim. Solar wind velocity isn’t the only indicator – you also need to consider the particle density striking the earth – when this is fairly high, say 7 protons/cm3 a good Aurora could be on the way. Another factor is a Southward Bz value. When pointing Southward it is an indicator a hole may be opening in the Earth magnetic field that could allow a spectacular Aurora to slip in.
If this technical talk doesn’t make much sense - simply visit these sites when a good Aurora is happening and write down the values of the gauges. Visit them again when there is no Aurora at night. After a few times you will see a pattern – when the readings begin to approach known values for your area – that’s your cue to charge batteries, clear memory cards and take a nap.. it’s going to be a good night!
Another great information asset is the Geophysical Institute of the University of Alaska Fairbanks. These people not only study the Aurora – they operate the only privately owned rocket launch facility – sending probes skyward for readings. Their aurora web sit is http://www.gedds.alaska.edu/AuroraForecast/ and provide easy to read graphics.
An asset for local weather is http://www.wunderground.com for your local vicinity weather report. It’s one of the few online weather sites that I have found to be consistently accurate. Although clear skies are best for viewing – having a few clouds in the photograph can help ‘anchor’ the shot. Scattered clouds are especially helpful when photographing from a large field an Aurora that is directly overhead and no tree tops are in view.
Take a Picture! Take a Picture!!!
Catching a great picture of the Aurora Borealis is serious low light photography. You are not going to ‘accidentally’ catch a photo that National Geographic will pay for their next cover on a Nokia cell phone camera. Digital or film – the principals are the same – and each medium has an advantage and disadvantage to weigh.
Taking pictures suitable for marketing or for sale to a large circulation magazine requires you to shoot with a minimum 35mm when using film or 5mp and higher digital camera. Consider shooting with both formats. If you have a Canon 35mm and Canon Digital that use EF lenses the digital camera can give an instant reading of the required ISO to load into the film camera for that lens and exposure time to catch the action. The digital camera is a bird dog – it catches some images and is used to ‘dial in’ your film camera.
The majority of us will probably choose between digital or film. There’s a limit to how much equipment you can handle and remember to use in pitch black darkness. Auroras are usually visible during the cold months of the winter. Nearly all film and digital cameras are specified to operate at +32F to 104F typically. Below 32F/0C you have issues of plastic and metal internal parts shrinking at unequal rates. Plastics shrink the most with metals the least. At -35F small internal plastic parts can shrink and fall out of place in a metal frame camera. Cameras with high-tech hard plastic frames will compress against metal internal parts causing binding, excessive wear and early failures. At low temperatures the internal factory lubricants turn to peanut butter consistency or worse, just go solid. Film does not like coming out of the canister in one piece. Ni-Cad and NI-MN batteries drain at an alarming rate. Once drained no amount of warming will help them recover.
That’s just the technical side of cold weather photography. Auto focus can be fooled into accidentally locking onto your breath, car exhaust, or heat waves from machinery in front of it. Any oils on the lens will attract your breath. A slight amount of your breath can fog the lens and it will remain there all night, un-noticed, ruining all your takes. It takes your eyes about 20 minutes to adjust to the darkness – you must know what every button on your camera does, and, where it needs to be set. Two reasons - one, so you can use the feature and take better pictures. Two – incase you accidentally hit the wrong button in the dark – you need to immediately know where to put it back to.
You need a good steady tripod. Manfrotto Wilderness is a good choice. It has retractable ice spikes, rubber coated so exposed skin does not stick to the cold metal, and it is strong enough to support a grown man from falling.
You need a camera that supports a remote shutter and the remote shutter that goes with it. You will be taking time lapse images to capture the Aurora – some at 2 seconds and others as long as 30 seconds – it will be too cold to hold the shutter button down. Your shivering will ruin the shot. An IR is not going to be much help – the cold will effect the IR frequency and the cold will give early battery failure. You need a cable release or an inexpensive wired release. You don’t want the expensive release with a built in timer, LCD display or battery powered because you won’t be using the timer, the LCD doesn’t work in the cold, it’s too dark to read the LCD anyway and the battery will fail in the cold.
You need a wide angle lens. Many digital cameras under $2000 have a ‘magnification factor’ because the image sensor is smaller than a normal 35mm piece of film and the focal length adds 1.5x to 1.6x to the lens being used. A 20mm on a Canon 20D (which is 1.6x) is actually shooting at 32mm. 32mm is the largest you want for sky work. Anything more than 32mm you will have problems fitting the whole Aurora into the picture – it will always leave the viewer feeling something is left out and missing from the picture. 20mm to 32mm is what I recommend you use.
Your lens needs to be efficient. A more efficient lens – say F/2.2 - will allow you to shoot at lower ISO’s. Lower ISO’s translate to less noise in the finished photographs. A more efficient lens will allow you to shoot at lower exposure rates – lower rates mean sharper images of the Aurora! Consider a 30 second exposure of someone trying to stand still – it’s not going to be in focus. Like wise a 30 second exposure of a moving Aurora is going to give a ‘puffy’ photograph. A 4 seconds exposure will yield a much sharper Aurora. A very efficient lens – say F/1.8 or lower - would allow you to shoot at both lower ISO’s and lower exposure rates.
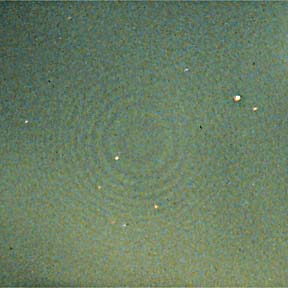
Do Not Use any Filters. Aside from acting as an attenuator to the light – creating a light loss and increasing your exposure duration - bad things can happen. Filters are mostly designed with visible light in mind, and, removing unwanted parts of the light spectrum and enhancing others. Because of the way they are made – spinning hot glass – UV and Sky filters give ‘concentric’ circles when used to capture the aurora. See below.
What works – what doesn’t – and what do I do to make it better? Your standard F/2.8-5.6 zoom that’s 26-80mm will work for you – providing you have a very good tripod and wired shutter release. Start at ISO 400 with a 12 second exposure. I have taken some great photos of the Aurora with this. The zoom was a little narrow in the field, the exposures a bit long – but – on a slow moving Aurora I got some amazing results.
Use of film above ISO 400 is not recommended for low light enlargements. If you enlarge the image beyond A3 paper size (13” x 19”) an ISO 800/1600 or 3200 film will be way too grainy. Don’t look at these faster films to make up for your low end lens. Best to bite the bullet and work with longer exposure rates.
Like wise in digital cameras – don’t plan on taking Aurora pictures above ISO 400. Yes, I know this is a shock, and, you probably paid more for a digital camera with these expanded ISO’s to 800/1600 and 3200. These are mostly used for high speed shutter photography – to make moving objects appear still. When used at night these ISO’s generate ALLOT of random noise. And just like film – when you enlarge the image beyond A3 size the noise becomes very noticeable – even if you use a noise removal program. The faster ISO’s are not match for a good lens – so – experiment with higher exposure rates than ISO’s to get a good image.
Below is an ISO chart that works well for film and digital camera ISO selections with different lens and speed combinations. I developed this chart from my Canon EF lens collection and lenses from my old Fujica 35mm. If you must use an inefficient lens just to see if you like working with Aurora photography – this chart will get you in the ballpark. Green is the ideal balance between ISO, Exposure Duration, and Noise. Yellow is pushing the limits where Noise and Image Quality can become questionable. Red is putting the envelop where the Noise may be so great not even Neat Image can fix it or the Exposure is so the photo will probably be too fuzzy. You are assured to capture something J Best to set your camera up outside on a dark night and do a trial run. Having a small flashlight handy – the kind that clip to your hat brim or Velcro to your fingers are very useful.
Digital Camera Aurora Photography Exposure Rates
|
F-Stop |
ISO 100 |
ISO 200 |
ISO 400 |
ISO 800 |
ISO 1600 |
ISO 3200 |
|
1.4 |
16 |
8 |
4 |
2 |
1 |
½ sec |
|
1.8 |
24 |
12 |
6 |
3 |
2 |
1 |
|
2.0 |
30 |
18 |
10 |
5 |
3 |
1.5 sec |
|
2.8 |
42 |
28 |
16 |
8 |
4 |
2 |
|
3.5 |
75 |
38 |
20 |
10 |
5 |
3 |
|
4.0 |
90 |
45 |
24 |
12 |
6 |
3.5 |
|
5.6 |
120 |
60 |
30 |
15 |
8 |
4 |
Location. Location. Location. Ok, you’ve signed up for Space Weather Alerts or at least know where to look for today’s Space Weather. You’ve already experimented with your camera outside. Next – you need to go for a ride, at night, when it’s very dark, and select some easy to reach spots to take night time photos from. In Fairbanks the beginning of an Aurora and the end are the most photogenic – so be mindful how long it takes you to drive to each spot form home. Simply looking over an area in daytime is insufficient. You are looking for a place far away from the light pollution of the city, town, nearby roads and street lamps. You need to stay away from dirt roads with frequent traffice – traffice will put dust in the air, the dust will reflect light, and your pictures will come out with light pollution showing. You can’t remove this in Photoshop. Find places with wide open fields and a good view of the sky – and – something at the far end to help give your photo a reference – tree, cabin or mountain will do. Ponds and lakes are good – especially if the Aurora isn’t particularly spectacular – capturing the Aurora in the sky and the reflection off the water make a good composition. Because you need a large wide view of the sky you are limited in the foregrounds available – so make the best of what you have.
Set Auto Focus to Manual. You probably already figured out, assuming you experimented at night, that your camera’s auto focus is no longer your best buddy. Auto focus has become an evil arch enemy. It won’t lock onto the stars for infinity, will cycle to both extremes when it sees your breath and in the cold – it will cycle both extremes for no apparent reason. You can’t simply shut auto focus off and move the manual focus ring all the way to infinity and have it work..infinity focus is actually all the way over, then back a little bit. Experiment with your lens, find the proper focus to get your ‘anchor’ in perfect focus and then lock that lens down. If your point and shoot camera does not have this feature – and it has auto focus – you are in for a very frustrating night. And day when you go to review the nights takes.
The trees about 300 yards away that you use as a foreground need not stay a black silhouette. You can fix this!! During your exposures use a Mag-Lite to quickly illuminate the trees – only takes a second or two – and they will come out with some color and definition. Better yet – use a military grade ‘SureFire” flashlight – these are so bright they are considered a weapon. Car and truck headlights work well too. Just don’t try this when there is a little fog or dust – it will bloom into light pollution.
Armed with the above information – you will be able to take the best photo your equipment will allow. If you are on a budget – the #1 most important item that will impact your results is having a camera with a ‘Bulb’ setting and accepts a wired remote and use this remote. If you have a wired remote – you can attain good results with an average tripod, not so sensitive lens and being stuck using lower ISO’s. Good luck.
Post Picture Processing
Your first few aurora pictures came out either absolutely brilliant or a dismal failure. Truth is – there is no such thing as a bad aurora picture. If you caught any of it at all your shots can be re-worked in Photo Shop and turned into something useful. Do not delete your failures – they may be salvageable later on in life when you have better editing skills. What used to take hours in the dark room can now be accomplished in minutes thanks to software like Photo Shop, Photo Suite, etc.
For film photographers - Digital Post Processing (DPP) is available by having your negatives professionally scanned, or, having a high resolution 8x10 made and scanned on a drum scanner. Drum scanners being a step or two up from flat bed scanners. Either method will introduce digital noise into the picture – so be sure to fix this item first. Read about noise below.
Photo Shop Elements is “THE” standard program issued with many digital cameras – I will use PSE tools and commands. The same tools are available in Photo Shop 6, 7, CS and other programs like Photo Suite etc only with slightly different names and places to find them.
Aurora, Ice Art, and other night time low light photography suffer from these issues:
a. Digital Noise – (noise increases as ISO speed increases)
b. Underexposure
c. Overexposure
d. Camera movement – blurry
e. Picture movement – star or aurora movements.
f. Color Corrections
***********************************************************************
The first step before doing any work on your image is to protect the original – and keep track of the steps and variations on the successive photographs generated. You will have a folder full of similar colored pictures all just a bit different from the one before and after it. You cannot assign a proper name to every shot – each shot and your edits need to have a uniform number format and code – otherwise you will loose track of your edits and accomplishments. When my camera images are saved, they look like this:
102-3721.jpg (is the original file)
102-3721-E.jpg means I have enhanced it.
102-3721-C.jpg means I have cropped it.
102-3721-T.jpg means I have touched it up.
102-3721-NI-C-E-T-web means I have used Neat Image, cropped, enhanced, touched up, and saved as a small size image for use on the web.
102-3721 “Aurora Smoke” would be the finished image
The beauty of adopting this kind of image saving label system – all your changes to the same photo are kept in the same place within the folder. Downside – if you took 2GB of photos last night this collection will expand to well over 8gb after all your editing is said and done. Do this several times a month and your hard drive will fill up, and, the files are too large and numerous even for saving on a 4.7gb DVD-R. The solution is use an external hard drive – 200gb should do – and save this in a secure place. Or use an online storage service. You are going to be using these photo files for a very, very long time so take good care of them.
HINT: Watch where your program saves the file! PSE does not automatically save your photo to the folder it was opened in – it assumes you want it in the folder the last save went. Same for saving as a web image – PSE puts it where the last web image you saved went.
Noise
Noise crops up in a digital camera when there are not enough photons striking the digital camera’s imager to be properly clocked into memory. Think of it as gaps, or, an electronic “duh” from the camera. Just as film photographers suffer from ‘grain’ when using film speeds above ISO 400 – in digital photography you have noise. This same type of noise is generated by scanning devices too
Noise, like grain, is best fixed while taking the shot – choosing a faster (lower F-Stop) lens and selecting lower ISO speeds is the best way to lower the noise. This was mentioned earlier.
Film photographers with a darkroom or access to custom developing could ‘push’ their film – and pushed film would be developed a little bit longer to help bring out the faint image when taken at lower then normal ISO’s. The benefit to lower ISO’s being better enlargements. If you are a film photographer – hunt down a custom developer and find out what they need from you when pushing your film. Generally, a log and ledger of each canister is required.
Digital noise can be electronically removed by a program called Neat Image and several others like it on the market. Neat Image at www.neatimage.com has a FREE downloadable version that works exactly like the pay version – just not as fast or handy. This program operates by either using a saved noise profile of your camera, or, building a noise profile from a fairly bland area of your photograph. Based on the noise found in the bland area, the program hunts downs similar occurrences in the entire picture, and eliminates them. A handy “Preview Window” allows viewing these changes in a selected area before modifying the entire image. Image (A) is a section of an especially noisy aurora picture before Neat Image and (B) is a piece at the same scale of the same image after Neat Image.
Image A Before
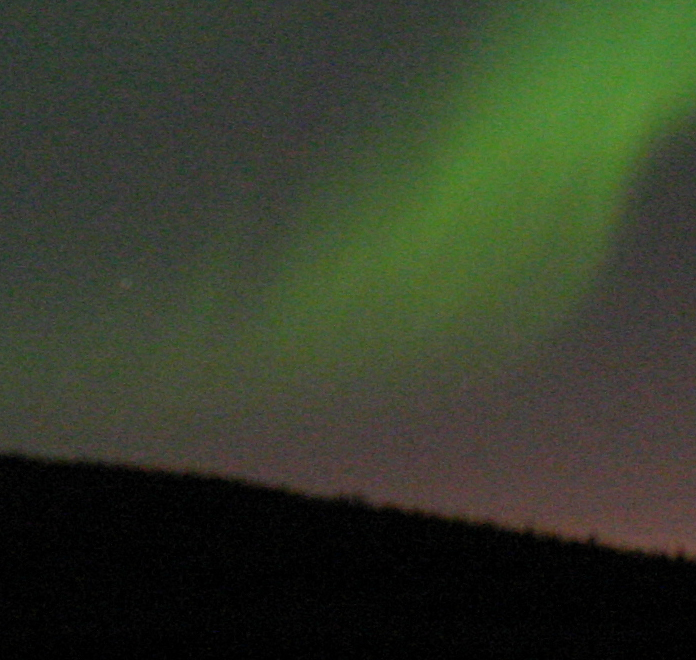
IMAGE B After
The pay version of Neat Image allows you to do batches of photos and will also automatically install itself in your copy of PhotoShop in the “Tool” menu. This is really a very handy “must have” program for the digital photographer. Neat Image will save your bacon.
Working with the sharpness and un sharp mask tools can also help your picture. The secret to making these do what you want – expand and enlarge the image so you can see the effect you are making on a small part of your picture.
Let’s Get Advanced!
With a digital camera below 5mp it’s going to be very difficult for a publication to take your work serious. I have had .3mp photos published on front and rear covers – so it is possible. They print out the best 8 x 10 of the photo possible and run it through a drum scanner. Drum scanner being about 100X better than your average flat bed scanner – the result is a final image that’s 11mp and about 29mb in size. It takes time to do this, and, time is money. If you only have 1 or 2 exceptionally wonderful pictures this isn’t a real hurdle. If you have 100 images to convert – it’s an average of $200 image to do this. Obviously taking a large file, high mp image to start with is the way to go.
If your camera is close to 5mp don’t make the mistake of shooting with small or medium sized files. Shoot the aurora with the largest .jpg file available to you. Below is a trick that involves shifting the camera’s color temperature to optimize for aurora capture – this will help your .jpg picture to be all it can be. However, to really capture as much of the aurora’s beauty as possible – you need to shoot in RAW format.
Try this. For people with a DSLR – there is an option that will help you take a better Aurora picture. Assuming you took some Aurora pictures with the camera at normal settings – go into Photo Shop and open one up. Go to Enhance>Quick Fix and check the box for color correction and >Apply. Yikes! Notice how the spectrum has shifted to the Blues and Purples. Not good. Take a peek at your ‘historgram’ for this photo – notice all the photo information is bunched up to the left side and compressed into one corner like a listing ship? Your photo is very dark, heavy on the Green spectrum, few white lights (stars), and if you attempt to do anything about it – kiss your stars good by. I would expect a night time picture to favor the left side – this is normal. If we can shift this data a bit to the center you will see a much nicer picture. Color correction does not work because your camera is set to a color temperature of 5200K. So, let’s change this!
In your camera’s menu look for a place to reset the color temperature from the normal 5200K to 7000K. Next time you see the Aurora go shoot with this setting – pay attention your photos are not underexposed – a little overexposed we can deal with. If your camera has it – set it to bracket shoot or you can bracket shoot manually. (Bracket shoot simply means take one photo normal, a second photo -2 F-Stop and a third photo at +2 F-Stop .. think of it as picture insurance). When you take this shot into Photo Shop you will notice it’s a little darker than expected. Don’t Panic. Go to Enhance>Quick Fix>Color Correction and Apply. Your photo will jump out at you in almost 3D effect, the stars are now showing and the color of the stars is perfect. Everything looks exactly like it did that night. This shooting technique takes advantage of the camera’s image sensor full available spectrum – and we have manually forced it to full advantage of all available light that is not removed from the internal UVIR filter. Photo shop simply corrected the image to what it should look like when you took the image. This technique works very well for standard Green Auroras and also allows the light amounts of reds and blues on the edges to be visible as well.
Dedicated Aurora Camera? DSLR cameras designed to pick up the full light spectrum – usually called UVIR cameras – can make a quiet aurora look spectacular. 99.99% of all digital cameras have a UVIR filter over the sensor – UV for Ultra Violet and IR for Infra Red. When you clean the camera sensor you are not cleaning the sensor, but, cleaning this UVIR filter. The IR needs to be filtered or the camera will lock into this spectrum and give blurry images. The UV needs filtering because it will detect details in a composition our eyes did not see. Among other things. UVIR cameras are used by scientists, astrophotographers and CSI (Crime Scene Investigators) – and when used with special filters and lamps can detect all sorts of things! To make a UVIR camera act ‘normal’ it must have a ‘Hot Mirror’ filter installed.
The older discontinued Canon 20A is a perfect example of a great Aurora camera. At 6.3mp it will capture light from the aurora your eyes cannot see. They show up on ebay now and then reasonably priced. The Fujica IS Pro is a 12+mp camera and the current high end Aurora camera. At $2500 for just the body it is not a cheap date – that – and you must be pre-approved to purchase one. There are companies online that will remove your existing camera’s sensor and install a non-filtered sensor in it’s place.
Having a dedicated UVIR camera for Aurora work is a good choice if this is where your major interest in photography are. However, these cameras are very difficult to work with.
RAW
I know. Mentioning RAW makes people’s eyes start to bleed and a desire to wrap layers of duct tape around their skulls. If you are into Aurora Borealis photography and willing to trample off into the dark tundra at -35F and take pictures of the sky – learning RAW is just another way to take BETTER PICTURES. RAW does require a little learning on your part - but you need to do it. The digital camera throws away 1/3 of the image sensor’s data when it compresses the shot to .jpg format. Low light photography is not a data rich medium – you need ever scrap of information possible. That saved data could be the difference between your photo looking great at 36”x 24” or stuck at A3 size 13” x 19” due to resolution issues. If the thought of shooting in RAW makes you want to ingest Tylenol – take a closer look at your camera’s available settings. Good chance you can take a RAW image + large .jpg at the same time. This provides a nice ‘safety net’ when transitioning between .jpg and RAW. Photo Shop Elements does not open RAW, but, most cameras that have this option come with a program disk that will – and – you can easily point this file browser to automatically open PSE for you. It’s not that bad, really. Although PhotoShop CS2 will make viewing and working with your image, and batches of images, easy – you need not upgrade to this.
In the long run shooting in RAW will probably save your shots. Allot of guessing goes into night time photography. RAW will allow you to clip low level darks that are generally noise in an aurora photo. With this junk removed your noise reduction program will be less intrusive on the finished file. When the aurora unexpectedly blooms bright – your buddy RAW will be there to scale this brilliance down and salvage the shot. RAW doesn’t care if your camera is still set for shade, small .jpg and -2 F-stop from the kids party you photographed yesterday – you dial in RAW and you capture everything possible. If you’ve ever found yourself in the dark trying to change the camera settings – well – shooting in RAW can help relieve allot of the stress. There will be plenty of time to stress out when you get home, where it’s warm, and the cocoa is ready.
Good Luck!
This ‘how to’ is a work in progress. If I waited until it was perfect – it would never make it to the web site. It is not meant as an all knowing holistic approach to everything Aurora. It’s a place to start. If you find any drastic errors please feel free to correct the paragraph and email the new update. I will make the changes and include your name and date somewhere in the text.
Kevin McCarthy
North Pole, Alaska
September 6, 2009
|